Thursday, August 27, 2020

Evergreen Forest in Silver Project Sheet

Evergreen Forest in Silver

The Evergreen Forest 3D Embossing Folder really makes this card 'POP' ... especially on silver foil


All images © 1990-2020 Stampin’ Up!®

Supplies:

Stamps: Merry Moose (150494)

Paper: Whisper White Thick Cardstock (140272); Seaside Spray Cardstock (150883); Feels Like Frost 6x6 Specialty Designer Series Paper (150444); Silver Foil Sheets (132178); Whisper White Cardstock (100730)

Ink: Seaside Spray (150085)

Other: Evergreen Forest 3D Embossing Folder (153576); Layering Circles Dies (151770); 1/4” Seaside Spray Metallic Ribbon (150446); Paper Snips (103579); Stampin’ Dimensionals (104430); Stampin’ Seal (152813)

Measurements:
Whisper White Thick – 8-1/2” x 5-1/2”; scored at 4-1/4” to form card base; 

Whisper White – 3-3/4” x 2-3/4”; scrap for sentiment

Seaside Spray – 5-1/4” x 4”

Silver Foil – 3-1/2” x 2-1/2” 

Feels Like Frost Designer Series Paper (DSP) – 3-3/4” x 3”

Directions:

  1. Fold Whisper White Cardstock in half to form card base. 

  2. Emboss both the Seaside Spray cardstock and Silver foil horizontally using the Evergreen Forest embossing folder. 

  3. Adhere the Seaside Spray to the card front. 

  4. Adhere the Feels like Frost DSP to the card on the left hand side. 

  5. Adhere the silver foil to the Whisper White cardstock. Adhere, using Stampin’ Dimensionals to the center of the card. 

  6. Cut the Metallic ribbon to about 7”. Fold into 3rds and adhere to bottom right of silver foil. 

  7. Stamp the saying onto the scrap piece of Whisper White. Use a Layering Circles die of approximately 1-1/4” in diameter to cut out. 

  8. Adhere the circle saying on top of the ribbon using Stampin’ Dimensionals. 

* * * * * * * * * * * * * * * * * * * *

Love this project? Here's what you'll need to gather to create this idea on your own ... just click on the images below and you'll be directed to my online store: Shop with Debbie!


CLICK TO SHOP: Product List

Thanks for stopping by today! If you have any questions,
please contact me and I’d be happy to assist you!

Make something pretty and get inky! *hugs*

Wednesday, August 26, 2020

Class To Go - Zany Zebras


I had this class all designed and half prepped when the stamp set went on back order last month!  The Zany Zebras are both whimsical and fun so I can see why they have been so popular.


The ZANY ZEBRA CLASS TO GO includes
FOUR different card projects. 

Your packets will include pre-cut, pre-embossed card supplies, embellishments, and your bow's all tied, so all you have to do is stamp, learn the techniques, and assemble!  See the supply list below to assemble these as shown in the PDF instructions, or create your own cards from the stamps you already own with the kit.

Recommended supplies to assemble these projects:
152536 Zany Zebra Stamp Set
147110 Night of Navy Classic Stampin’ Pad 

147158 Neutrals Stampin’ Write Markers 
141897 Clear Wink of Stella Glitter Brush 
  • You'll also need: Seal Adhesive, Dimensionals, Glue Dots, Liquid Glue, Paper Snips.

The Ultimate Collection – $30

  • Includes Zany Zebra Stamp Set 
  • Paper Supplies & Embellishments for FOUR cards
  • Full step-by-step PDF Tutorial
  • Shipping is $5 and only available in the US

Just the Kit (no stamps) – $20

  • Paper Supplies & Embellishments for FOUR cards
  • Full step-by-step PDF tutorial
  • Shipping is $5 and only available in the US

PDF Tutorial only – $15

PDF Tutorial only – order your own products, cut your own cardstock, and provide your own embellishments. Instructions include a full tutorial for each project including cutting measurements and photos. 


Orders will close on Sept. 10. Kit shipping date will be approximately Sept. 20th. PDF instructions will be e-mailed when the kits are shipped.

Of course, backorder or discontinued situations from Stampin’ Up! are out of my control and may affect expected shipping dates. Substitutions not affecting overall project details may be required. I will do everything I can to minimize any disruptions and get the products to you as soon as possible. All sales are final.

Got Questions?  Just email me if you need more info. 

Thanks for stopping by today! If you have any questions,
please contact me and I’d be happy to assist you!

Make something pretty and get inky! *hugs*

Friday, August 14, 2020

Rainbow Glitter Sunflower Project Sheet

Rainbow Glitter Sunflower


All images © 1990-2020 Stampin’ Up!®

Supplies:

  • Stamp Sets– Celebrate Sunflowers Bundle (154065)

  • Cardstock – Blackberry Bliss (133675); Bermuda Bay (131197); Whisper White (100730); Rainbow Glimmer Paper (153056)

  • Stamp Pads – Blackberry Bliss (147092)

  • Misc. – Adhesive Sheets (152334); Stampin' Seal (152813); Dimensionals (104430); die-cutting machine.

Measurements:

  • Blackberry Bliss: 5-1/2 x 8-1/2” (scored at 4-1/4”)

  • Bermuda Bay: 4” x 5-1/4” 

  • Whisper White: 3-3/4” x 5”

  • Glimmer Paper: 3-1/2” x 4-1/2” 

Instructions:

  1. Fold the Blackberry Bliss cardstock in half to form the card base.

  2. Adhere the Bermuda Bay layer to the card base. 

  3. Place a piece of Adhesive Sheet on the back of the Whisper White cardstock covering the section where you will die-cut the sunflower, then use die-cuts to cut out flower and leaves. 

  4. Remove the backing of the Adhesive Sheet of Whisper White layer and adhere to the card front using extra Stampin’ Seal Adhesive around the edges.

  5. Remove the backing from the cut out flower and place it on card front. 

  6. Stamp the greeting on Whisper White cardstock and “fussy-cut” it with scissors. Add to card front using Dimensionals 

* * * * * * * * * * * * * * * * * * * *

Love this project? Here's what you'll need to gather to create this idea on your own ... just click on the images below and you'll be directed to my online store: Shop with Debbie!


Thanks for stopping by today! If you have any questions,
please contact me and I’d be happy to assist you!

Make something pretty and get inky! *hugs*

Friday, August 7, 2020

August Paper Pumpkin Kit

With Paper Pumpkin, subscribers are provided with everything they need to explore their creativity and discover new ways to craft. As we navigate a “new normal” in today’s world, there’s plenty of opportunity to papercraft! And, more importantly, there’s no better time than now to create something that’ll show the essential people in your life just how awesome you think they are.

Lately, it’s become especially clear who the everyday heroes are—they’ve always surrounded us! Teachers, doctors, hairdressers, nurses, delivery workers, cashiers, and even our friends, kids, and family members go above and beyond to enrich our lives. These people are truly the world’s greatest at what they do!

Celebrate and appreciate the everyday heroes in your life with the August Paper Pumpkin Kit. The cards included in this kit are specifically designed for celebrating life’s champions! 


WATCH VIDEO What's Inside? With a monthly Paper Pumpkin craft subscription box, you'll save time and money . . . and eventually build a collection of versatile Stampin’ Up! crafting supplies. Design: While the elements of the August kit can be used to show appreciation for anyone, the masculine card designs are perfect for the men in your life! 
Project Type: 9 Cards & Envelopes size: 4-1/4” x 5-1/2” 
Coordinating Colors: Bumblebee, gold, Mint Macaron, Pacific Point, Soft Suede, white 

Subscribe to Paper Pumpkin before the 10th.

Thanks for stopping by today! If you have any questions,
please contact me and I’d be happy to assist you!

Make something pretty and get inky! *hugs*

Saturday, August 1, 2020

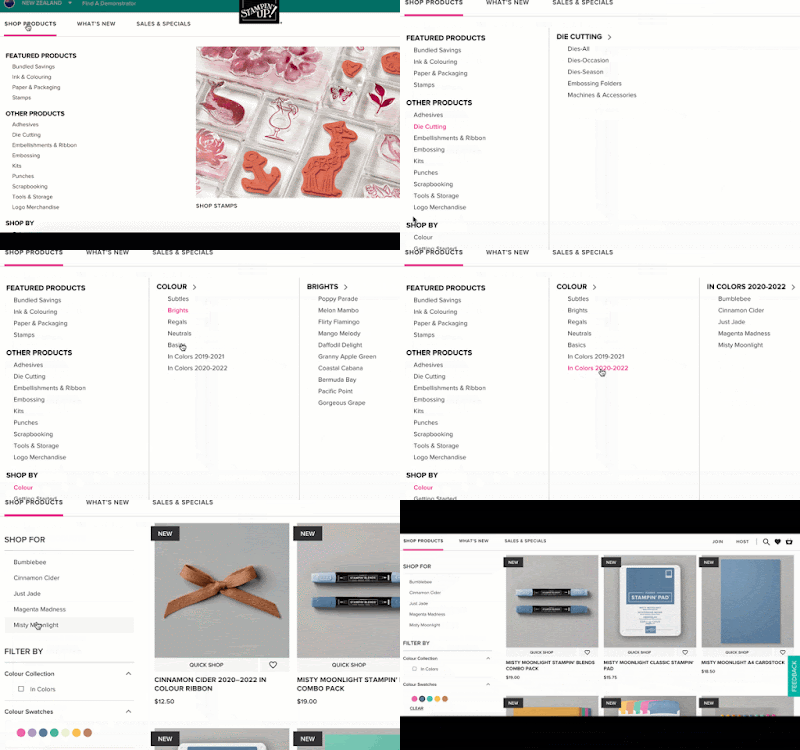
Stampin' Up! Online Store Is Updating August 4th – what you need to know!


Beginning August 4th at 7:00 AM (MT) Stampin' Up! is bringing you a new and improved online shopping experience!

There are quite a few improvements that you'll really like.  I'm most excited about the new site working seamlessly on desktops, smartphones, and tablets, larger images for products and samples, more intuitive navigation and searches, and last but not least, you can create a wish list and favorites!

Rest assured your account information and password still work with the new site. Because this is a new site you will need to sign in the first time you shop. If you had your browser remember your email and password, it won't be saved anymore. If you are unsure of your login ID and password, I recommend using the Forgot Password link to reset your password as soon as possible (see steps below)

I kindly ask that you visit my store starting August 4th, sign in, and please select me as your demonstrator. 

See the picture with the Sign In steps above.

1. Click Sign In
2. Sign in with email and password
3. Click the Forgot Password link if you need to reset your password. 

Improved Navigation

It’s easier to find what you are looking for with navigation menus that expand. For example, the image shows what happens if you select “Stamps” from the Featured Products section. You can then narrow down your search by Season, and then refine it even more with a specific season.

Improved Filtering

When you are shopping you’ll see Filter By in the menu on the left.

You can Filter By several options including size, price, product type, occasion, color, etc.

Wish List & Favorites List

You can also add items to a new list or Wish List from the quick view page, not just the individual product page. You could track product you already have on hand.

Filter & Sort by Color

If you click on the Shop By Color link you’ll see every color listed. Click on the color to see the products available in that color.


I hope you enjoy all the new features.  I appreciate your business and want to continue offering you amazing products and my personal service, so please be sure to update your preferred demonstrator selection.

Thank you for taking the time to visit and read my blog!
You are appreciated!
Make something pretty and get inky! *hugs*