Showing posts with label Christmas. Show all posts

Wednesday, September 8, 2021

SEPTEMBER CLASS TO GO: TIDINGS OF CHRISTMAS

TIDINGS OF CHRISTMAS CLASS TO GO

It’s time for a little Christmas Card Making to help you get a jump start on your Christmas Cards this year. It’s 100% self-paced so that means you can complete it whenever it’s convenient for you. The class will come to you, by mail, so you can put together the cards right in the comfort of your own home!

The TIDINGS OF CHRISTMAS CLASS TO GO 
includes TWELVE cards (3 each of 4 designs)
and features products from theTidings of Christmas suite
on page 88 in the annual catalog. 
The class also includes a printable .pdf tutorial with 4 bonus ideas!!!


See the supply list below to assemble these as shown in the PDF instructions, or create your own cards from the stamps you already own with the kit.
Please note: I am not able to provide stamped images in the class package as the images are © Stampin’ Up! 

Supplies used: Tidings & Trimmings Stamp Set and Christmas Trimmings Dies, Tidings of Christmas Designer Paper, Evening Evergreen Chevron Ribbon, Metallic Pearls, Adhesives.
INKS: Cherry Cobbler, Evening Evergreen, Misty Moonlight, Sahara Sand, Soft Succulent


The Complete Class - $70

  • Includes Tidings & Trimmings stamp set and Christmas Trimmings Dies
  • Tidings of Christmas 6 x 6 Designer Series Paper (24 sheets)
  • 1/2 Package of Metallic Pearls (121 pieces)
  • Evening Evergreen 3/8" Chevron Weave Ribbon (2 yards)
  • All paper supplies needed to make the TWELVE cards
  • 12 Envelopes
  • A full color PDF Tutorial with step-by-step instructions for each card + 4 BONUS ideas
  • Shipping is included

Just the Essentials - $35 (Use your own Stamps & Dies)

  • Tidings of Christmas 6 x 6 Designer Series Paper (24 sheets)
  • Evening Evergreen 3/8" Chevron Weave Ribbon (2 yards)
  • 1/2 pack of Metallic Pearls
  • All paper supplies needed to make the TWELVE cards
  • 12 Envelopes
  • A full color PDF Tutorial with step-by-step instructions for each card + 4 BONUS ideas
  • Shipping is included

PDF Tutorial only – $15

A full color PDF Tutorial with step-by-step instructions for each card.
O
rder your own products, cut your own cardstock and provide your own embellishments. Tutorial includes step-by-step instructions for each card including cutting measurements and photos. 4 BONUS ideas are included.

To order, contact me at myturn4fun@gmail.com.

I will place the orders on September 16th.
Shipping will be approximately 1 week later.
PDF Tutorial will be emailed same day I send the card kits.


Per Stampin' Up! policy, payment is required before I can order your stamp set and class supplies.

Once I receive the orders, I will prepare the class supplies, sort & package everything and mail your Class to Go kit right away. I will also e-mail the .PDF instructions to you.

I want you to have this Class To Go in your hands as soon as possible so you can start creating your own works of art.

Of course, backorders or discontinued situations from Stampin’ Up! are out of my control and may affect expected shipping dates. Substitutions not affecting overall project details may be required. I will do everything I can to minimize any disruptions and get the products to you as soon as possible. All sales are final.

Thanks for stopping by today! If you have any questions,
please contact me and I’d be happy to assist you!

Make something pretty and get inky! *hugs*

Christmas Whimsy Card Kit Now Available!!

CHRISTMAS WHIMSY CARD KIT


How cute is this?! Stampin’ Up! Just added a new kit to their kit line up, and it contains everything you need to complete the eight cards…even a clear block for the stamps! Well, you’ll need scissors to cut the gold cord embellishment, but everyone has scissors in their house, right? It’s called Christmas Whimsy and the item number is 158166.

Christmas Whimsy is an adorably festive card kit that you will love at “frost” sight. Santa’s elves might be hard at work but with this all-inclusive kit, the hard work is done for you! All the pieces are printed, die cut, and ready for you to craft. 


The simplicity of the kit makes it perfect for beginner crafters and kids, too! Everything you need to create eight elf-centric Holiday cards is included like printed card bases, die cuts, embellishments, an exclusive stamp set, a Night of Navy Classic Stampin’ Spot, and more!

Here is a look at the stamp set that is included:


Check out the unboxing video that Sara made:


You can view all available kits HERE. 

Thanks for stopping by today! If you have any questions,
please contact me and I’d be happy to assist you!

Make something pretty and get inky! *hugs*

Thursday, December 11, 2014

Gift Wrapping Idea

Christmas is creeping on us fast!  If you need  an elegant presentation for a special gift, this box will do the trick!


SUPPLIES:

Stamp Sets:
Bright & Beautiful (w-135026; c-135029) You'll need the large star and second largest.

Ink:
Cherry Cobbler Ink Pad (126966)
VersaMark (102283)

Paper: (including cutting dimensions)
Trim the Tree Designer Series Paper Stack (135824): 5 pieces of 2-1/4" x 3-1/4"
Vellum Card Stock (101856): 5-1/2" x 8-1/2"
Whisper White Card Stock (100730): 5-1/2" x 8-1/2"

Accessories:
24 inches Cherry Cobbler 1"€ Sheer Linen Ribbon (135839)
Cherry Cobbler Embossing Powder (122949)
Silver Embossing Powder (109131)
Dazzling Details Cherry Cobbler (125585)
Candy Dot Regals Collection (130932)
Stars Framelits (133723) You'll need the second largest and third largest.
Stampin' Dimensionals (104430)
Sticky Strip (104294)
Kraft Box (124106)
Heat Tool (129053)
Embossing Buddy (103083)
Bone Folder (102300)


INSTRUCTIONS:
1. Before assembling your box, glue panels of Designer Series Paper to all four sides and top flap of box with Sticky Strip.
2. Assemble box:  Crease all score lines with Bone Folder.  Create the box bottom by folding in the side flaps, then the front flap.  Fold in the final flap, and insert the tab in the notch of the front flap.
3. Rub the vellum and whisper white card stock with the Embossing Buddy.
4. Using VersaMark, stamp one large and one medium star on the Vellum and repeat the same on the Whisper White
5. Sprinkle the stamped Vellum card stock with Silver Embossing Powder.
6. Sprinkle the stamped Whisper White card stock with Cherry Cobbler Embossing Powder.
7. Melt the Embossing Powder with the Heat Tool.
8. Cut the stars with the Big Shot and coordinating Framelits.
9. Insert your gift and close box.
10. Cut ribbon in two, wrap one piece around the box and attach to bottom using Sticky Strip.
11. Wrap the second piece around the box in the other direction and tape to bottom using Sticky Strip.
12. Attach large Cherry Cobbler Star to top of box using Sticky Strip.
13. Using Dimensionals, adhere the remaining layers of stars.  Start with the large Silver Vellum, next is the medium Cherry Cobbler and finish with medium Silver Vellum. Stagger the points of the stars as seen in the photo.
14. Embellish the top star with a Cherry Cobbler Candy Dot in the middle, and Dazzling Details on the points of the center star, as seen in the photo.
 
Enjoy making and giving this project this holiday season!  If you need any supplies, you can find the at my ONLINE STORE. Be sure to check out the CLEARANCE RACK, too, as new products have been added!!

Thank you for stopping by,

Friday, November 14, 2014

Looking for the Perfect Holiday Gift?

Paper Pumpkin Prepaid Subscriptions are the perfect gift this holiday season—
for friends, family, and yourself! A fully designed project kit will arrive each month with stamps, ink, and paper so anyone can skip to the fun.

It’s the gift that keeps on giving!


ItemPrepaid SubscriptionPrice (Shipping Included)
137858 1 month$19.95 
137859 3 months$59.85
137860 6 months$113.70  Save $1 per month
137861 12 months$215.40  Save $2 per month

This is how it works:
  1. Place your order at www.mypaperpumpkin.com  Then you, or the person you choose the gift for, will receive an e-mail with instructions on how to redeem the prepaid subscription.
  2. Go back to www.mypaperpumpkin.com and enter the redemption code.
  3. You, or the person you choose the gift for, will start enjoying your monthly Paper Pumpkin project kit the very next month!
It's that easy to give the gift of creativity, and you don't even have to leave the comfort of your own home to purchase it, or worry about wrapping, or shipping.  This is as easy as your holiday shopping can get.
 
 
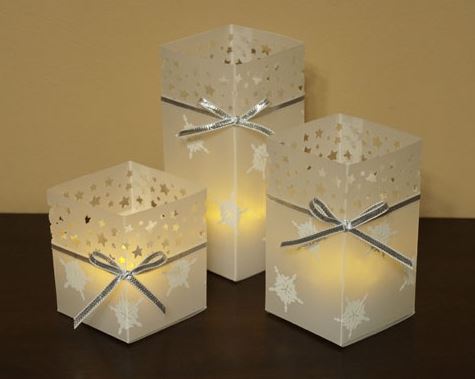
These candle holders would also make beautiful gifts or home decor:

Image
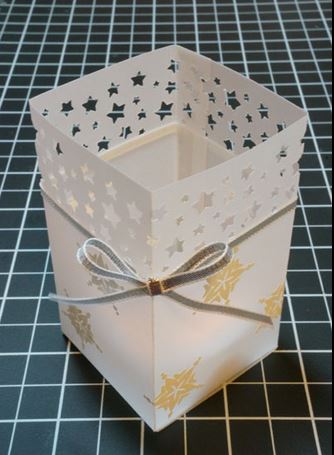
Are you in a crunch for time, and need to make a quick gift for a friend, co-worker, or neighbor? With just a few basic tools and supplies, you can whip this cute tea light trio up in a jiffy!
Image
Image
SUPPLIES:
Stamp set:
Bright & Beautiful (wood - 135026, clear - 135029)

Ink:
VersaMark (102283)

Paper:
White Vellum Cardstock (101856): 4 ½" x 8 ½", 5 ½" x 8 ½", 6 ½" x 8 ½"

Accessories:
Embossing Buddy (103083)
Heat Tool (129053)
White Stampin’ Emboss Powder (109132)
Sticky Strip (104294)
Silver 1/8" Ribbon (132137): 18" x 3
Confetti Stars Punch (135861)
Simply Scored Scoring Tool (122334)
1/8" double-stick adhesive tape (non-SU)
3 battery-operated tea lights

Note: Each size is scored and assembled the same.

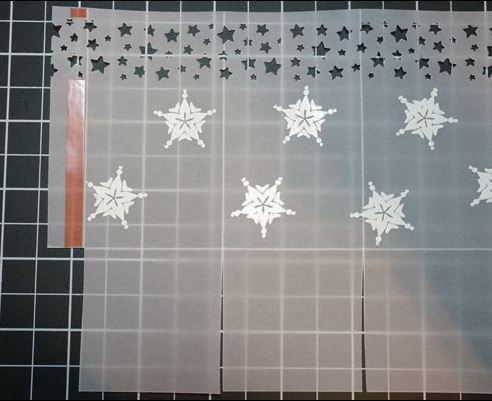
1. With 8 ½" edge of cardstock at top of scoring tool, score at 2", 4", 6", and 8".
2. Rotate cardstock 90 degrees clockwise and score at 2" to form bottom flaps.
3. Snip on flap score lines up to the 2" score. Trip off bottom ½" flap.
4. Punch top edge using the Confetti Stars Punch.
5. Rub Embossing Buddy over cardstock to eliminate static, then stamp the smallest star (from Bright & Beautiful) in VersaMark randomly over cardstock.
6. Sprinkle with embossing powder, tap off excess, and heat with Heat Tool until melted.
7. Apply Sticky Strip to ½" flap and form box. Fold up bottom flaps and adhere with Sticky Strip.
8. Apply 1/8" adhesive just below punches stars, and adhere silver ribbon leaving 5" tails for tying bow. Tie bow.

These cute tea light holders can be dressed up even more by adding Jewels Basic Rhinestones (119246), or instead of the embossed stars, glue some Frosted Sequins (135835) on for extra bling!

If you have any questions or want to order the products used for this project CONTACT ME today! I would be more than happy to help you out!
Thank you for stopping by,

Monday, November 3, 2014

White Christmas Snowman


Supplies:
Stamp Sets: White Christmas #135767

Cardstock: Soft Sky #131203, Whisper White #100730

Ink Pads: Soft Sky #131181, Memento Black #132708, Cherry Cobbler #126966

Misc.: Cherry Cobbler Blendabilities #130995; Flesh tones Blendabilites #129370; Filigree Frame Embossing Folder #135818; Textured Boutique Machine #132657; Sponge #101650; Dazzling Diamonds #133751; Two-Way Glue Pen #100425

Measurements:
Soft Sky Cardstock: 5.5” x 8.5”
Whisper White Cardstock: (2) 4” x 5.25”

Instructions:

1. Emboss Whisper White cardstock using Filigree embossing folder and Textured Embossing Boutique machine.

2. Lightly sponge Soft Sky ink in middle of embossed cardstock. You may want to practice this first on scrap or back of embossed cardstock. You only want a little ink sponged across cardstock.

3. Stamp tree image using Memento ink in middle of embossed and sponged area and just a little towards the top (to leave room for sentiment).

4. Place snowman and sentiment together on a block, lining up so you can stamp where you want along the tree line. Stamp using Memento ink.

5. Color trees using a brown from the flesh tones Blendabilities.

6. Color snowman’s hat and scarf using Cherry Cobbler Blendabilities marker.

7. Fold Soft Sky cardstock in half and attach the decorated white cardstock to Soft Sky cardstock.

8. Stamp the inside sentiment using Cherry Cobbler ink on the other Whisper White cardstock and attach to inside of card.

If you would like to create this card, you can order products at my online store.
Thank you for stopping by!

Monday, October 27, 2014

Gentle Peace Christmas Card


Gentle Peace Christmas Card with Blendabilities


SUPPLIES:
  • Stamp Sets: Gentle Peace Photopolymer (139523)
  • Paper: Coastal Cabana (131297), Whisper White (100730)
  • Stamp Pads: Memento Black (132708)
  • Misc: Stampin’ Blendabilities: Coastal Cabana (131000),Cherry Cobbler (130995), Crumb Cake (131004), Daffodil Delight (130998), Night of Navy (131001), Old Olive (130999), Skin Tone (129370), Lucky Stars Embossing Folder (135817), Big Shot (113439) Stampin’ Dimensionals (104430), Paper Snips (103579)
MEASUREMENTS:
  • Card Base is Coastal Cabana cut at 8 1/2 x 5 1/2 scored at 4 1/4.
  • Whisper White is used for both images, the banner is 3/4 x 4.
INSTRUCTIONS:
  1. Using the Lucky Stars embossing folder emboss the card base.

  2. Stamp the Nativity image on a scrap of Whisper white with Memento.

  3. Stamp the words on the Whisper white piece that is 3/4 x 4 inches.

  4. Color the image with Blendabilities.

  5. Cut out the Nativity image and adhere to card base with dimensionals.

  6. Cut the word image into a banner and then curve with your fingers, apply to card base with a dimensional.

This card was made with the newly released stamp set, Gently Peace. 
I love the stained glass effect using our blendabilities.
You can find more information about this stamp set on my website HERE.

Thanks for stopping by,

Tuesday, July 8, 2014

Christmas in July PLUS Weekly Deals!!


Beauty of the Season sneak peek set
Hi, Stampers:

2 brand new Christmas stamp sets  have been released .
  • Beauty of the Season click HERE
this set will be in the Holiday catalog starting 
Aug 28,2014  but  you can pre-order it right now!!
Christmas Bliss   NEW Photopolymer
Brand new Photopolymer stamp set
  • Christmas Bliss click HERE
Plus, another NEW Photopolymer stamp set is available
(this is the boy version of Sweetie Pie which is SOLD OUT):
Dear Heart PhotopolymerDear Heart click HERE
  
DSPPromotion
Thru July 31st, when you buy 3 Designer Series Paper Packs, you will receive one FREE ($10.95)!


Weekly Deals until July 14th
Weekly Deals click HERE 


Clearance Rack
Clearance Rack will be updated July 10th  click HERE


Thanks for stopping by!