Thursday, April 16, 2020

Ornate Garden Thanks Project Sheet

Ornate Garden Thanks

All images © 1990-2020 Stampin’ Up!®
Supplies:
  • Stamp Sets – Ornate Thanks (149471); Ornate Style (152572)
  • Papers – Whisper White (100730); Terracotta Tile (150884); Mint Macaron (138337); Ornate Garden Specialty Designer Series Paper (DSP) (152488)
  • Stamp Pads – Terracotta Tile (150086); Versamark (102283)
  • Accessories – Gold Embossing Powder (109129); Ornate Garden Ribbon Combo Pack (152479); Gilded Gems (152478); Dimensionals (104430)
  • Tools – Ornate Layers Dies (152726); Stitched Rectangle Dies (148551); Heat Tool (129053); Die Cutting Machine
Measurements:
  • Terracotta Tile cardstock: 4” x 5”
  • Whisper White cardstock: 3-1/2” x 4-1/2” 
  • Mint Macaron cardstock:  4” x 5”       3/4” x 3” strip
  • DSP: 5-1/2” x 12” scored at 1-3/4”, 4-3/4” and 7-3/4”
  • Ribbon: 20”
Instructions:
  1. Cut frame from Terracotta Tile cardstock using Ornate Layers Dies. 
  2. Cut stitched rectangle framelit for inside of card from Mint Macaron cardstock and the one that fits in the ornate frame from white cardstock. 
  3. Stamp floral image on white stitched rectangle cardstock using Terracotta Tile ink.
  4. Emboss “Thanks” sentiment on Mint Macaron strip with Versamark ink, gold embossing powder and heat tool. Flag the ends of strip with scissors.
  5. Fold the DSP along the score lines so the shortest contrasting side of the paper is on top. Adhere Mint Macaron stitched rectangle to the inside back (for writing on) and the Ornate frame to the edge of the contrasting piece on the front. Layer stamped floral image inside the frame and add “Thanks” with dimensionals.


  6. Tie ribbon around the left side in a bow. 
  7. Add gold gilded gems to flower images, as desired. 
Love this project? Here's what you'll need to gather to create this idea on your own ... just click on the images below and you'll be directed to my online store: Shop with Debbie!

CLICK TO SHOP - Product List

Thanks for stopping by today! If you have any questions,
please contact me and I’d be happy to assist you!
Make something pretty and get inky! *hugs*

Tuesday, April 14, 2020

Clearance Rack Refresh ... Up to 60% Off!!

I LOVE it when this happens!!

Stampin' Up! has updated the Clearance Rack and it's AWESOME!
Tons of dies, paper, ribbon, kits and more!
ALL at deep discounts ... up to 60% off!!!

Just so you know, supplies are limited, so products will go quickly.
So, be sure to grab your favorites right away!! 

Click HERE to order, and while you're at it, you can stock up on envelopes, cardstock, Retiring 2018-2020 In Colors, and the new Ornate Garden Suite!

TIP:  To see the most recent items added to the Clearance Rack, 
click 'Sort By' and change it to 'NEWEST'.


Thank you for shopping with me!! 
Stay safe and enjoy your day!

Saturday, April 11, 2020

Kits to Ease Boredom and Add Fun to Your Days!

Are you searching for a quick cardmaking journey to brighten up your quarantine time? 

Then, let me show you some all-inclusive kits that make it easy for new stampers to hop right into some fun or provide fun-styled cards to an experienced crafter. They even include ink and a clear stampin' block ... All you need is your favorite adhesive.


The Looking Up Card Kit features Hot Air Balloons, 
Airplanes and Palm Trees with Happy Birthday, Feel Better Soon, Congratulations, Thankful for You and Thanks So Much sentiments.

(#149651) 15 cards; $27.00


The Lots of Happy Card Kit sentiments say: Sending you Lots + Lots of Happy, I'm Here for You, Thank you for being a Friend, Here's to the Happiest Birthday Yet, You deserve the Best Life has to offer, and two different styles of flowers that can be colored with the four included watercolor pencils.
(#146388) 20 cards; $35.00


The Notes of Kindness Kit has Thank You, Thanks and You're So Kind for sentiments and has several pretty die cuts included.

(#148266) 20 cards; $35.00


To order these kits, just click on an image below and you will be directed to my online store: Shop with Debbie!


CLICK TO SHOP - Product List


Thanks for stopping by today! If you have any questions,
please contact me and I’d be happy to assist you!
Make something pretty and get inky! *hugs*


Thursday, April 9, 2020

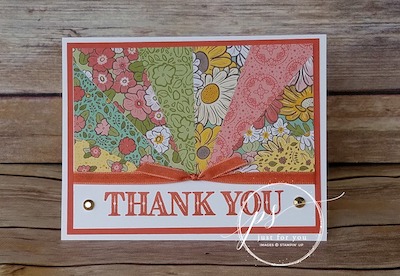
Ornate Thanks Sunburst Project Sheet

I hope that while you are home keeping safe that you are also looking at your paper stash and might like a new technique. Introducing the Sunburst technique - the perfect paper technique!
Here's what you need to do: look through your paper stash and collect several strips that coordinate in color, design, or both. Grab your paper cutter, choose a phrase and consider matching embellishments. 
The card below uses the brand new Ornate Garden specialty designer series paper:

Supplies:
  • Stamp Sets – Ornate Thanks (149471)
  • Cardstock – Thick Whisper White (140272); Whisper White (100730); Terracotta Tile (150884)
  • Stamp Pads – Terracotta Tile (150086)
  • Misc. – Ornate Garden Specialty Designer Series Paper (DSP) (152488); Ornate Garden Ribbon Combo Pack (152479); Gilded Gems (152478)
Measurements: 
  • Thick White: 8-1/2” x 5-1/2”, scored at 4-1/4” for card base
  • Whisper White: 5” x 3-3/4”; 5” x 2-3/4”
  • Rich Razzleberry: 5-1/4” x 4”
  • DSP: 4” x 1-1/2” (at least 4 pieces; I used all the papers on this card, but choose to not use the foiled sides)
  • Ribbon: 7” & 4”
Instructions:            
  1. Cut each of the DSP pieces in half diagonally to form 8 triangles.
  2. With a pencil, mark the center point of long edge of smaller piece of Whisper White cardstock. Apply adhesive to entire piece.
  3. Align one long edge of DSP to center line. Align remaining triangles to both sides of first piece, being sure that entire piece of white cardstock is covered. Turn over and trim excess from back.
  4. Adhere DSP piece to larger piece of Whisper White cardstock and then to Terracotta Tile cardstock. Stamp “THANK YOU” with Terracotta Tile ink.
  5. Adhere 7” Terracotta Tile ribbon along seam, adhering to the back. Tie 4” ribbon around longer piece in a single knot.  Adhere layer to folded card base.
  6. Attach one Gilded Gem to either side of greeting.
Love this project? Here's what you'll need to gather to create this idea on your own ... just click on the images below and you'll be directed to my online store: Shop with Debbie!

CLICK TO SHOP - Product List

Thanks for stopping by today! If you have any questions,
please contact me and I’d be happy to assist you!
Make something pretty and get inky! *hugs*

Monday, April 6, 2020

ANNUAL Adhesive Stock Up Sale -- EXTENDED to APRIL 25th

Due to unexpected backorders, 
this sale is extended to APRIL 25th!!

Several of you have been asking if I'll be offering my adhesive sale this year and the answer is YES!!

It's Back....

ANNUAL STOCK UP ADHESIVE SALE!!!

Monday, April 6, 2020
thru
Monday, April 25, 2020
available only thru me, Debbie Flattum!
30% off Stampin' Up! Adhesives
(tax & shipping calculated on catalog price)

E-MAIL or call me with your adhesive order 
(Sale prices are NOT available at my online store since this is my personal sale to my valued customers)
*See note below for online orders*


* ONLINE ORDERS *
You may also place your order online. However, the adhesive sale prices are only available thru ME. If you place an online order, you will be charged the regular price; but, I will issue you a PayPal refund or product credit for the difference (your choice).
Also, by ordering online, you can add other products to your order.

Please use Host Code 69Q6THD4.

** Orders need to be placed by Saturday, April 25th! **


Thank you for selecting me as your Stampin' Up! Demonstrator! 
I appreciate your business and friendship!