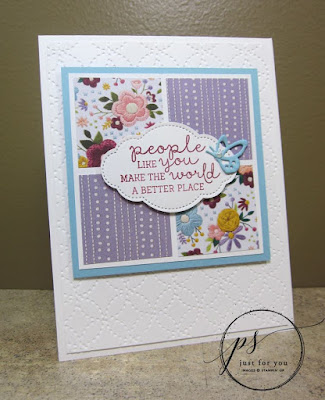
When you cut your designer paper, do you find yourself saving all the small pieces just in case you might need them later? I know I do ... I have a LOT of saved designer paper.
This card is a great way to use all those smaller pieces plus the embossed cardstock gives it an extra touch of elegance.
Needlepoint Nook Four Squares Card
All images © 1990-2019Stampin’ Up!®
Supplies:
- Stamp Sets– Needle & Thread Bundle (150626 cling) or Needle & Thread (148724 cling)
- Cardstock & Paper – Needlepoint Nook DSP (148807); Balmy Blue (146982); Whisper White (100730); Thick Whisper White (140272)
- Stamp Pads– Berry Burst (147143)
- Misc. – Basic Pearl Jewels (144219); Quilt Top Impressions Folder (144687); Butterfly Beauty Framelits Dies (148536); Needlepoint Elements Framelits (148541); Big Shot (143263); Pretty Label Punch (143715); Tear & Tape Adhesive (138995); SNAIL Adhesive (104332); Stampin’ Dimensionals (104430); Mini Glue Dots (103683)
Measurements:
- Whisper White Thick: 4-1/4” x 11” scored at 5-1/2”
- Whisper White: 4” x 5-1/4”; 3-1/4” x 3-1/4”; 3” x 3” scrap
- Needlepoint Nook DSP: Four 1-1/2” x 1-1/2” squares (2 each of 2 patterns)
- Balmy Blue: 3-1/2” x 3-1/2”; scrap for butterfly die-cut
Instructions:
- Emboss Whisper White cardstock with Quilt Top Embossing Folder. Adhere to Thick Whisper White card base with Tear & Tape Adhesive.
- Adhere four DSP squares to Whisper White square leaving 1/8” space between squares.
- Adhere onto the Balmy Blue mat, then pop up with Dimensionals.
- Run through Big Shot with the Needlepoint Elements label framelit to get the stitched border, then punch with the coordinating Pretty Label Punch. Pop up with Dimensionals.
- Die-cut Balmy Blue small butterfly with Butterfly Beauty Framelits. Attach with Glue Dot.
- Add a single Pearl Jewel to the butterfly.
If you would like to create this project, here's a list of the products you'll need to gather! If you click on the photos below, you will be directed to my online store: Shop with Debbie!
CLICK TO SHOP - Product List
Thanks for stopping by today! If you have any questions,
please contact me and I’d be happy to assist you!
please contact me and I’d be happy to assist you!
Make something pretty and get inky! *hugs*


No comments:
Post a Comment